To run effective campaigns marketers should have control over the traffic. While creating your marketing strategy make sure you establish how are you going to measure performance and track your links. In the omnichannel marketing era, you might find it more challenging to realize which campaigns and channels are the most effective for your brand. UTM parameters come to save the day! Keep on reading to learn more 😉
What are the UTM parameters?
UTM parameters (aka UTM codes) are bits of text you can add to a link that tell Google Analytics (as well as other analytics tools) a little bit more information about each link.
Check out an example:
- https://example.io/?utm_source=quora&utm_medium=cpc&utm_campaign=conversion&utm_term=july&utm_content=image
Thanks to UTM codes you can track your links and learn where your traffic is coming from. Therefore, you’re able to analyze your ad campaigns, affiliate programs, etc.
The biggest advantage of using UTM parameters is that it can give you genuine information about your traffic. For example, when you run a campaign on Facebook and users copy your URL and share on other social networks, it will still have your original UTM codes so that you’ll know the traffic is driven by the same post or ad.
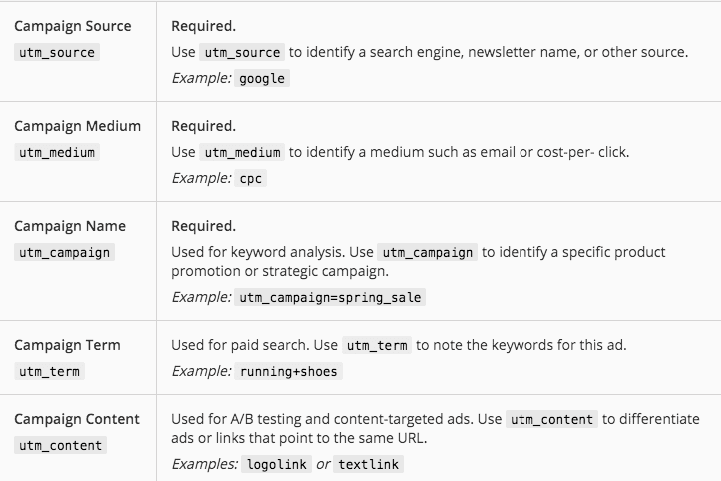
Each UTM parameter provides marketers with crucial information.

You can create UTM codes in Google URL builder. Even though nowadays it’s crucial to add UTM parameters to your links, they can seem too long and confusing. Thankfully, in RocketLink you can not only add UTM codes but also shorten your URLs. Read on to find out more!
How to create UTM parameters via RocketLink?
1. Define how you’re going to name UTM codes
Before you start using UTM codes in your campaigns, you need to create a naming convention. That way, you can avoid confusion and mistakes regarding the analysis. Define whether you’re going to use dashes or underscores, as well as lowercase or uppercase and camel case. Don’t repeat codes, for example, don’t use ‘Twitter’ in both source and medium parameters. Write down the rules and keep them in mind while creating new URLs.
2. Sign up for RocketLink – you can try it out for free!
Set up you’re account in a few minutes. RocketLink offers three pricing plans and an option to use a custom plan that is tailored to a user’s needs. You can try every plan for 10 days for free. Thanks to the trial you can find out whether RocketLink meets your expectations and decide on the future subscription.
3. Create a new link
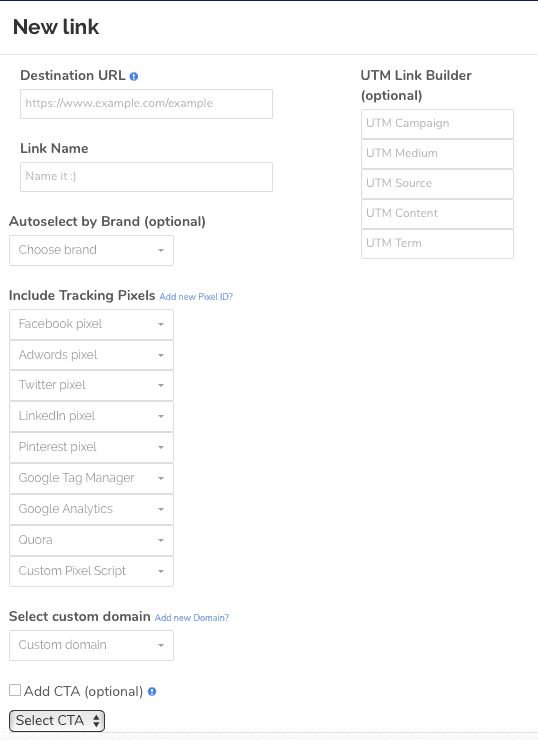
Go to the ‘Links’ section and create a new link. Paste destination URL and add a link name to find it easier in the future. Add UTM parameters according to your naming guide. Define campaign, medium, source, content type, and term to make sure to track the link properly in Google Analytics. RocketLink will make your long URL short and sweet in no time! You can even custom your domain to improve branding and gain trust.

Psst! If you’d create your links in Google’s URL builder, you’d have to track the links in a spreadsheet and remember to paste every new link into the document. Sounds like an annoying task, right? Fortunately, in RocketLink you can find all of your links and their stats so that you can keep them under control.
Does RocketLink have more superpowers?
In fact, RocketLink creates more opportunities, when it comes to the links. RocketLink is a URL shortener that provided users with many additional features. Not only that you can shorten your links via RocketLink, but also add retargeting pixels, UTM parameters, as well as all sorts of widgets (pop-ups, CTAs, chat boxes, etc.).
It’s a great way to engage customers, start a discussion, learn more about customers, gain newsletter subscribers, and redirect traffic. To make the most of your marketing efforts you need to think forward and give your potential customers a chance to convert.
Contact us to find out more about RocketLink and improve your marketing performance!


